Landscape timbers are a good way to border a flower bed or a play area. To keep them in place drill 1/2" holes through the timbers and hammer 8" sections of rebar through the holes and into the ground. If you are going two timbers high use the same method, but drill through both and use 14" lengths of rebar to" pin" the timbers together and secure to the ground.
|
Today I finished the plate rail and here is how I did it. If you read the previous post, you would know that I started with a 5 panel door that was at least 60 years old. Getting this door apart was a challenge, the tenon joints were extremly tight and, of coarse, there were little finish nails hidden below the surface that had to be removed before anything was coming off. I wasn't sure of the type of wood the door was made from since it had a finish over it, come to find out it was pine and extremely soft! My client wanted the rail to be about 80" long so the ledger needed to be 78" ( a one inch over hang on the ends is standard if the plate rail is to be used as a shelf), the door had plenty and I could even saw off some bad places. The rail and ledger are made from the long side beams of the door, the vertical parts that hold it all together, the panels and horizontal beams sit in grooves cut into the vertical beams. After the door was apart, I had to come up with a plan to fill these grooves since my client wanted the routered detail to remain. I decided to use the panels, they came from the gooves anyway so they fit and it would save time by not having to cut a piece down from some other stock. I cut them so that the filler pieces would sit flush with the front of the routered edge, I think it looks better this way. I had to cut two pieces per rail because the panels were not 80" long, but it worked out fine. I glued them in place after they were sanded and polyurethaned. I also wanted to use them to give some light contrast to the already dark finish on the wood, this allows the routered detail to stand out and be noticed. I also cut a groove into the top rail that is 1/8" deep and 3/16" wide so that plates or other things will have a place to sit and "grab" the rail and not slide off. When that was complete, I proceeded to assemble the rail and ledger, I used construction adhesive and brads to hold it together, made for a nice fit. The dental blocks were made from one of the smaller beams, I just used a table saw to cut them down to size, in this case the larger ones are 2" x 2 1/2" and the smaller ones are 1" x 2 1/2" and they are just glued on. I drilled holes in the larger blocks and into the ledger so that the knobs could be screwed into them and to allow extra space for the long studs. Now it's ready to be attached to the wall. I left the rails the original thickness, normally plate rails are thinner than this one, so it's chunky and it goes with the style of my clients house. It's a good DIY project that gets you that high end distressed look everyone is looking for right now, it also keeps good material out of the landfill. Use what you've got, it might just start a trend. 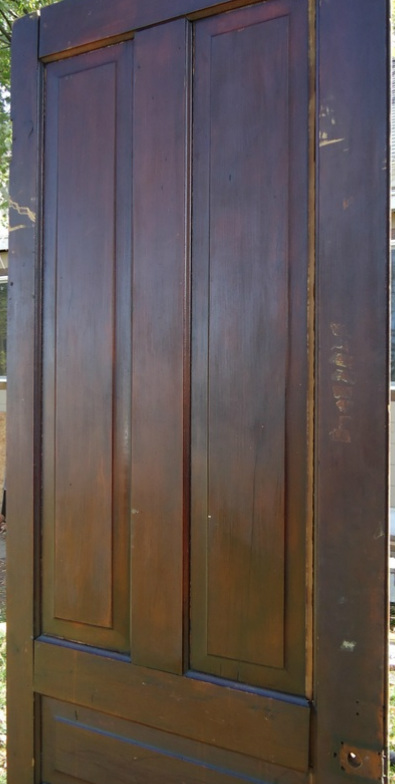 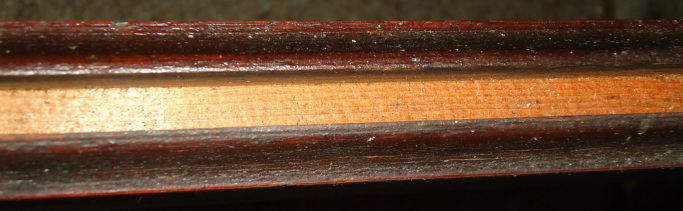    I am doing a couple of reclaimation projects, one on a front porch ceiling and one for a client who wanted a plate rail. My client, lets call her Jane, has a house built circa 1900 and had doors that came from the house at least 60 years ago. Well, instead of just throwing these away, Jane wanted to use one of the doors to make a plate rail. The doors came from the house, fit the houses' style, and it is a good use of the material, so that's what I set out to do. Getting the old door apart was a J-O-B. The crafstman sure did build them to last, but with the help of a motivator, a rubber mallet, and a couple of hours of using it to beat my head, the door finally gave up the fight. Whew, not a moment to soon, my head was getting sore. Anyway, I have the pieces cut and got a few details with Jane ironed out, we decided on dental blocks for moulding, I am ready to proceed with this project. I will get more pics up as the project progresses. 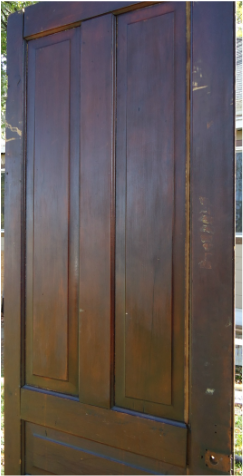 I'm working on a new project that is "green" and cool and unique at the same time. I know what you're thinking, "All of that at one time in one space.....there must be a rift in the time space continuum." Well, hopefully not and yes that is alot of ways to describe one project, but it's true. It has to do with a front porch ceiling and reclaimed wood. I'll leave it at that for now. Look for pics and more blog posts about this wonderful thing happening in Richmond, Indiana.
Perhaps it is like reporting any public hazard—if you don’t do it, someone could be injured or killed. When an untrained worker does renovation on buildings containing lead, he exposes himself, his client, and his family to a lead hazard. He may spread lead dust throughout the home he’s working on, and he can carry lead dust home on his clothes, face, and hands. The lead safe practices used by certified RRP contractors minimize this possibility—thus protecting the residents of the building, the construction worker, and his family.
When a lead-safe certified contractor drives by a pre-1978 project that he bid on and sees the work being done by non-certified renovator, just how is he supposed to feel? He is obeying the law and doing business in safe manner, yet he is losing income needed to pay his employees and support his family to the renegade renovator. A contractor in Maine shot a video of a non-compliant renovator sanding the side of an apartment complex without containment, PPE, or any safety precautions. Then he posted the video on YouTube. Although it took several months, the non-compliant renovator was eventually cited and fined by the EPA. CONCLUSION The EPA admits that without people bringing RRP violations to their attention their enforcement efforts are diminished. They are hoping that the majority of contractors have a willingness to report misconduct by non-compliant renovators. When compliant contractors have their livelihood jeopardized by what amounts to criminal activity, reporting RRP violations is not vicarious snitching but only good corporate citizenship. I had the opportunity to go out and look at a deck that was damaged by fire today, for the purposes of fixing it. This deck was constructed of a treated wood frame and a composite shell. What is "composite" anyway? It is a combination of recycled wood, dust or fibers, and a plastic or some kind, like PVC. When I thought of "composite", I knew it was a recycled product and normally maintenance free, that's part of the draw. I thought that this product was somewhat superior to wood, it ought to be for the price. After looking at the deck today, I'm not so sure. The fire started on an outside corner and spread to the entire underside of the deck, driven by wind. All of the joists were burnt and the flooring charred. Though the top of the decking wasn't affected, I'm not sure of the structural integrity of it after being burned on the bottom and subjected to intense heat. This got me wondering what the fire rating of composite decking was. After some research most of the decking available locally has a fire rating of "C". That is the same as wood, but unlike wood this has a plastic in it. A plastic fire seems to be a little harder to put out and not to mention the smoke and toxic fumes released when burned. The house the deck is attached to definitely has smoke damage from the burning composite. My hope is that others would not falsely assume that because this product is a "composite" that it is somehow more fire resistant than regular wood. The ease of use and low maintenance make this a good product, but the same care should be taken as with traditional materials and the cost of replacement taken into consideration.  Well the wood blanks or chunks that I have are Spalted Maple. Spalted because of the markings in the wood. This is sought after for its unique markings and if you look it up online, it's pricey stuff to get. I have several hundred pounds and if anyone is interested in it please let me know. Here is some info from spaltedmaplelumber.com
Spalting Spalting is any form of wood coloration caused by fungi. Although primarily found in dead trees, it can also occur under stressed tree conditions or even in living trees. There are four distinct types of spalting. However, only three of them are actually considered pleasing. Contents 1 Types 1.1 Pigmentation 1.2 White Rot 1.3 Zone Lines 2 Conditions 3 Commonly Spalted Woods 4 Common Spalting Fungi 5 Spalting Research 6 References Types Spalting is divided into three main types: pigmentation, white rot and zone lines. Spalted wood may exhibit one or all of these types in varying degrees. Pigmentation Also known as sapstain, or in its most common form, bluestain, this type of spalting occurs when the darkly-pigmented fungal hyphae grow in the sapwood parenchyma of a tree [1][2]. A visible color change can be seen if enough hyphae are concentrated in an area [3]. These pigmentation fungi often colonize wood via the rays, but are not considered decay fungi due to their non-destructive use of easily available wood carbohydrates [4][5]. The most common groups of pigmentation fungi are the imperfect fungi and the Ascomycetes [5]. Mold fungi, such as Trichoderma spp., are not considered to be spalting fungi, as their hyphae do not colonize the wood internally. While pigmentation fungi do not degrade the wood cell wall, this type of decay can lead to a reduction in toughness (amount of energy absorbed before breaking), and increased permeability [6]. Pigmentation can occur on both hardwood and softwood, unlike other types of spalting which are more host specific. White Rot The mottled white pockets and bleaching effect seen in spalted wood is due to white rot fungi. Primarily found on hardwoods, these fungi 'bleach' by consuming lignin, which is the slightly pigmented area of a wood cell wall [7]. Some white rotting can also be caused by an effect similar to pigmentation, in which the white hyphae of a fungus, such as Trametes versicolor (Fr.) Pil., is so concentrated in an area that a visual effect is created [8]. Both strength and weight loss occur with white rot decay, causing the 'punky' area often referred to by woodworkers. Brown rots, the 'unpleasing' type of spalting, affect these same properties, but at a much faster rate [3]. Both types of rot, if left uncontrolled, will turn wood useless. Zone Lines Dark dotting, winding lines and thin streaks of red, brown and black are known as zone lines. This type of spalting does not occur due to any specific type of fungus, but is instead an interaction zone in which different fungi have erected barriers to protect their resources [5]. The lines are often clumps of hard, dark mycelium, referred to as pseudosclerotial plate formation [9]. Zone lines themselves do not damage the wood. However, the fungi responsible for creating them often do. Conditions Conditions required for spalting are the same as the conditions required for fungal growth: fixed nitrogen, micronutrients, water, warm temperatures and oxygen [10][3]. Water: Wood must be saturated to a 20% moisture content or higher for fungal colonization to occur. However wood placed underwater lacks sufficient oxygen, and colonization cannot occur [6]. Temperature: The majority of fungi prefer warm temperatures between 10 and 40°C [6], with rapid growth occurring between 20 and 32°C. [11] Oxygen: Fungi do not require much oxygen, but conditions such as waterlogging will inhibit growth [12] [13]. Time: Different fungi require different amounts of time to colonize wood. Research conducted on some common spalting fungi found that Trametes versicolor, when paired with Bjerkandera adusta, took 8 weeks to spalt 1.5" cubes of Acer saccharum.[14] Colonization continued to progress after this time period, but the structural integrity of the wood was compromised. The same study also found that Polyporus brumalis, when paired with Trametes versicolor, required 10 weeks to spalt the same size cubes. Commonly Spalted Woods The Ohio DNR found that pale hardwoods had the best ability to spalt . Some common trees in this category include maple (Acer spp.), birch (Betula spp.) and beech (Fagus spp.). Common Spalting Fungi One of the more tricky aspects to spalting is that some fungi cannot colonize wood alone; they require other fungi to have gone before them to create more favorable conditions. Fungi progress in waves of primary and secondary colonizers [2], where primary colonizers initially capture and control resources, change the pH of the wood and its structure, and then must defend against secondary colonizers that then have the ability to colonize the substrate [2] [16]. Ceratocystis spp. (Ascomycetes) contains the most common blue stain fungi [17]. Trametes versicolor, (Basidiomycetes) is found all over the world and is a quick and efficient white rot of hardwoods [2]. Xylaria polymorpha (Pers. ex Mer.) Grev. (Ascomycetes) has been known to bleach wood, but is unique in that it is one of the few fungi that will erect zone lines without any antagonism from other fungi [18]. Spalting Research Initial lab work was conducted on spalting in the 1980s at Brigham Young University. A method for improving machinability in spalted wood using methyl methacrylate was developed in 1982 [19], and several white rot fungi responsible for zone line formation were identified in 1987 [20]. Current research at Michigan Technological University has identified specific time periods at which certain spalting fungi will interact, and how long it takes for said fungi to render the wood useless [14]. Researchers from this university also developed a test for evaluating the machinability of spalted wood using a universal test machine[21]. References ^ Corbett, N.H. (1975). Micro-morphological studies on the degradation of lignified cell walls by Ascomycetes and Fungi Imperfecti. J. Inst. Wood Sci. 14, 18-29. ^ a b c d Rayner, A.D.M., and Boddy, L. (1988). Fungal Decomposition of Wood. Its biology and Ecology. John Wiley and Sons: New York. ^ a b c Zabel, R.A., and Morrell, J.J. (1992). Wood Microbiology. Decay and Its Prevention. Harcourt Brace Jovanovich, Academic Press, INC: New York ^ Dowding, P. (1970). Colonization of freshly bared pine sapwood surfaces by staining fungi. Trans. Br. Mycol. Soc., 55, 399-412. ^ a b c Rayner, A.D.M., and Todd, N.K. (1982). Population structure in wood-decomposing Basidiomycetes. Cambridge University Press: New York. ^ a b c Eaton, R.A., and Hale, M.D.C. (1993). Wood. Decay, pests, and protection. Chapman & Hall: New York. ^ Liese, W. (1970). Ultrastructural aspects of woody-tissue disintegration. Annu. Rev. Phytopathol. 8, 231-257. ^ Blanchette, R.A. (1984). Screening wood decayed by white rot fungi for preferential lignin degradation. Appl. Environ. Microbiol. 48 (3), 647-653. ^ Cease, K.R., Blanchette, R.A., and Highley, T.L. (1989). Interactions What we have here is a tree that was cut as standing dead. Using what little bark was left on it, I belive it is either maple or ash. Very unique, cool looking wood, very rustic. All of the colors and patterns are as they occured in the tree. I have this up on the ReStore. This would be good for wood workers to make bowls or tables or seats, will clean up very well! The bigger chunks are 100+ lbs. Let me know if you are intersted. Awesome project material! 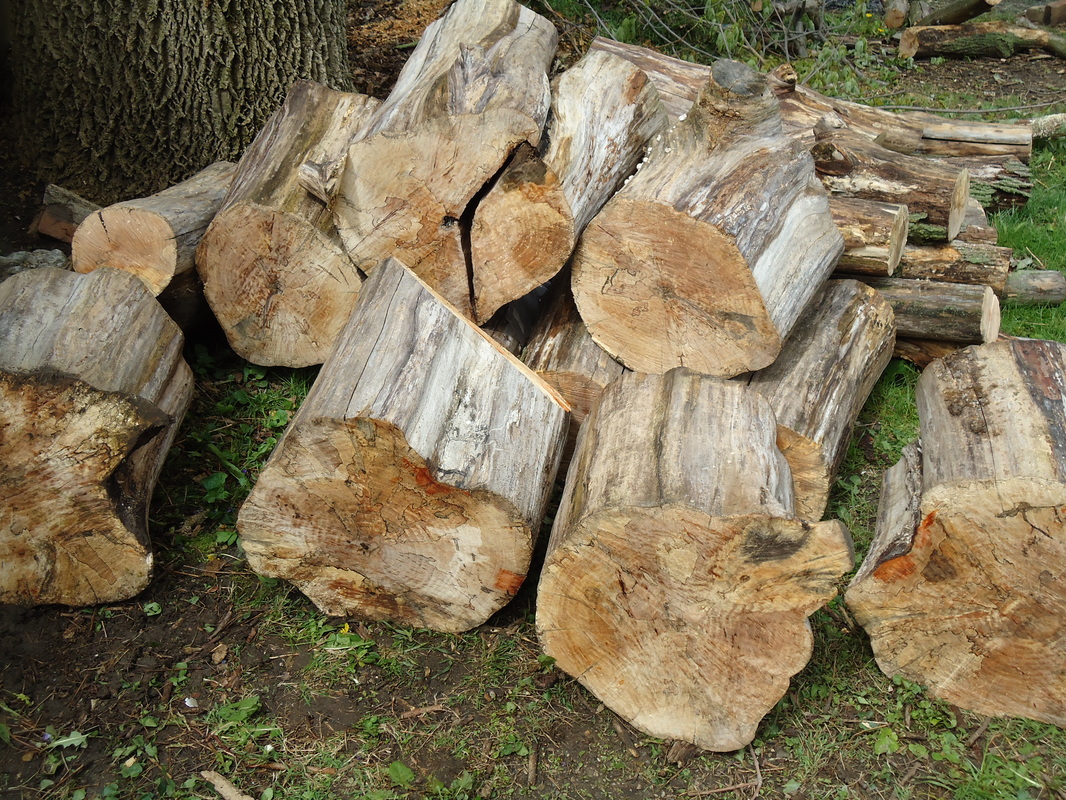 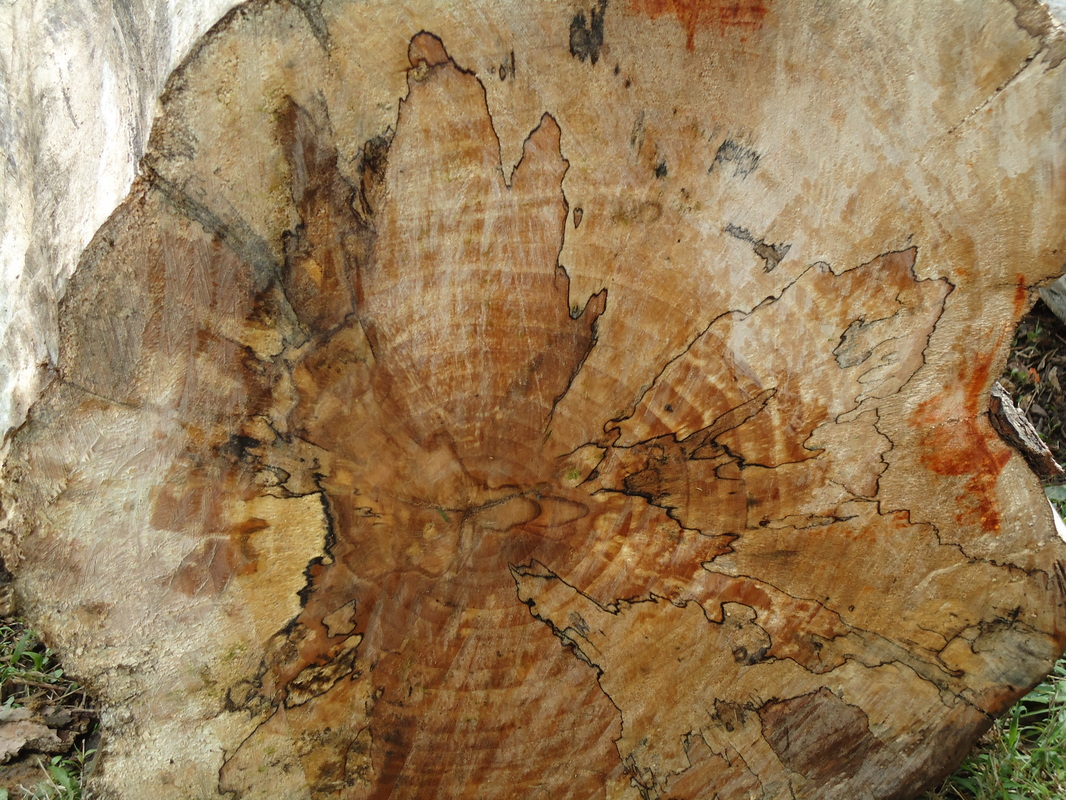  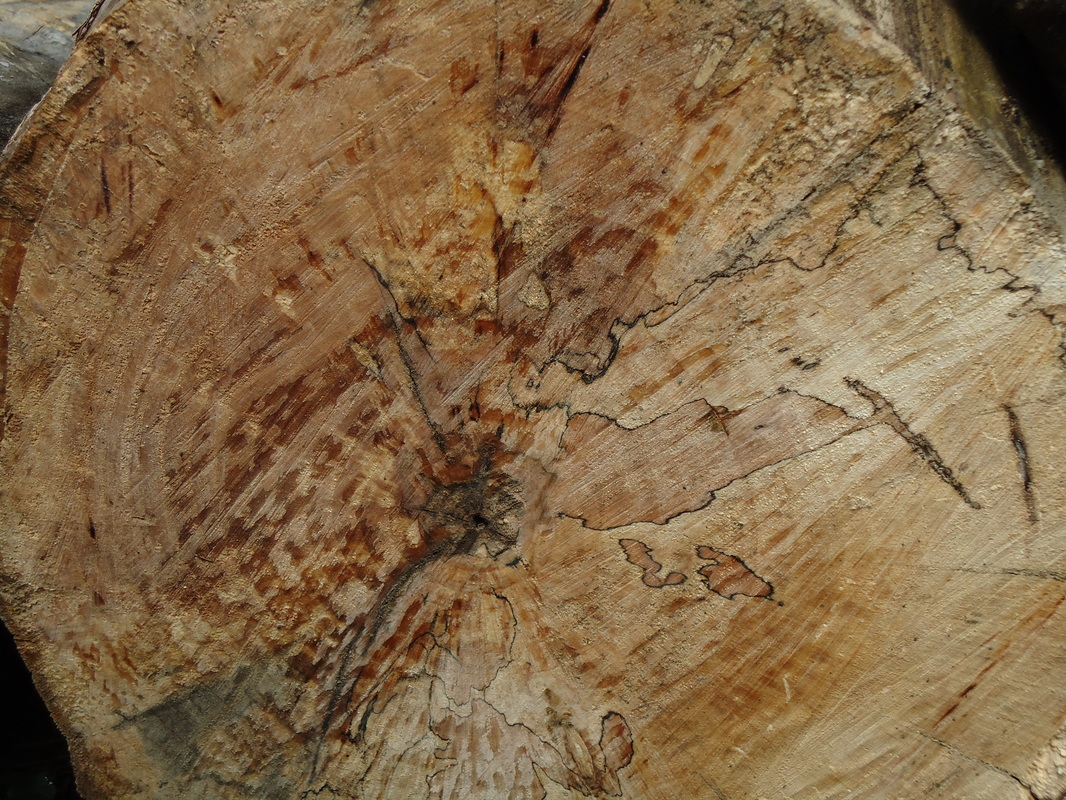 Have you ever went to your local home improvement store for a counter top and just didn't like what they had in stock? Then the sales person wants you to special order something, but come to find out it's four times as much as the off the shelf stuff. Well, if you're not installing granite or some other natural stone or exotic product, why not fabricate your own. As most of you know, I'm renovating a house from 1890 (though there isn't anything from that time period that I have found) and I have put in new kitchen cabinets and flooring. All of the "stock" counter tops that I found had back splashes on them and to special order was about four times as much. So, I decided to fab my own. Nothing extravagant right now, just particleboard with a laminate covering. I'll add the back splash later (I'm going to use some of the split stone granite all the way across), the thing is it will be custom and the way I want it to look without having to spend hundreds and have to wait weeks on the factory. It's also good experience and a useful skill. Joining the pieces may prove a challenge (over 11 feet of base cabinets on one side), but I'm sure I have it figured out. I get pics up soon.
|
AuthorCraig Jones, owner of Property Serv LLC. My goal is to better educate the homeowner and to make Richmond a better place to live. Archives
October 2013
Categories
All
|
 RSS Feed