Property Serv LLC
765.277.2578
  • Front Page
    • EPA Rules and Renovation
  • About
  • Projects
  • Contact
  • You've Been Serv'd (blog)
  • Satisfaction

Updates

10/10/2012

0 Comments

 
Just though I would throw some updates on here, things have been very busy since the last post.  Just built and installed a tv mount for the Innovation Center.  The interior design is industrial/innovative, so I used 2" sqaure tubing and 1/4" plate and went from floor to ceiling.  supporting 30 lbs of tv.....no problem.  Also, just finishing up privacy issues in an office for another commercial client.  Black out flim on glass doors and installing verticle blinds in front of 9 foot tall windows, that should do the trick. 
The entry wall in my house has been framed and drywalled, currently waiting for mud to dry so I can sand and apply the next coat.  I'm thinking of putting marble on the floor for a grand entrance.  Over the summer I have also installed some new windows and insulation and removed alot of plaster and lath. 
A couple of large projects still in the works and I'm hoping these will come through to get us through the winter.  Keep checking here or an FB or Pinterest, or LinkedIn for updates and project info and even pics.
0 Comments

Tip of the Week

12/6/2012

0 Comments

 
Sanding drywall:  When sanding drywall seams, it's good to follow the seam instead of going against it.  It's better to go in circles, this way everything is blended and faded instead of getting that "path" from over sanding.  Use a scrap piece of lumber or something hard and flat to put under your sand paper, this will keep things uniform.  Using your hand can result in high and low spots which ultimately leads to more work.  Also if you need the seams to dry quickly, try mixing your own "mud" instead of using the premix.  The powedered mix comes in drying times of 20 minute, 45 minute, and 90 minute.  The work times aren't very long with these so keep moving!
0 Comments

Tip of the Week

5/6/2012

0 Comments

 
Picture
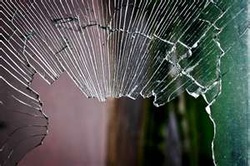
Pane in the glass: So a window has just become the victim of a solid object traveling at a fairly good speed, now what do you do?  (If you have traditional windows in your house or garage, follow these steps.  If you have thermal pane or other insulated glass, call a glass company to order a replacement unit.)  Time to remove the glass from the frame, this is better done from the outside if possible because the glass goes in from this direction.  Wearing gloves and eye protection use a pair of pliers to grab the shards, if the glass breaks under the galzing a chisel will work to remove both.  After the area is free of glass and glazing measure the opening and give yourself 1/8" in both directions.  Call your local glass company and have the glass cut, if the frame isn't completely sqaure a wood chisel can be used to "adjust" the opening to accomodate the new pane.  Also, pick up a box of points from the glass company, thses are used to hold the glass in the frame.  Apply new glazing and you're done.

0 Comments

Tip of the Week

29/5/2012

0 Comments

 
Picture
Caulking: Caulking can be a messy job that results in what looks like a 3 year old played arts and crafts with your house.  Not to worry, here are a few tips to help you out.  Around glass or a finished surface, use painters tape on either side of the joint being caulked.  This will save you time on clean up and it's ok if the process gets a little messy, if caulk gets on the tape you can peel it right up.  For the "professional" look, wet your finger and run it down the bead to smooth it out and remove the excess, this will also work if you want to use a putty knife.  Just wet the knife and run it down the bead.  Using a putty knife to tool the caulk or window glazing may take some practice.  Part of the blade will need to follow a flat surace to keep things looking good, every movement made or bump the knife hits will show up in the caulk.  Also be careful not to remove to much caulk or it will be ineffective.  Follow the manufacturers recommendations for proper adhesion and sealing.  Happy caulking.

0 Comments

Light at the End of the Tunnel

16/2/2012

0 Comments

 
I've been working on the second house of the year since 30 January.  This job has had highs and lows, changes, and more changes.  Things have gone back and forth so many times the original ideas are back and getting done and of coarse there was a deadline.  Through it all I have tried to remain calm and appreciative of the work.  Things are finally coming together and I can see the light at the end of the tunnel.  Ready to move on to the next one.
0 Comments

Off To A Good Start

6/2/2012

0 Comments

 
It's only the beginning of February and I have been covered up with work.  I'm on second house painting/remodel job in less than four weeks. I also have roofs lined up for this year and a partnership with my credit union on a new mortgage program.   Hopefully this sudden increase in work load is more permanent rather than a temporary flux.  2012, some say it might be the end of the world, I say it's only the beginning.
0 Comments

What's In A Home

13/12/2011

0 Comments

 
Throughout the year with projects both for customers and my own, I have often wondered "What's this made out of?".  Asbestos has popped up a few times this year and I have even been asked about asbestos abatement.  We all know what the old pipe insulation looks like, the corrugated cardboard like stuff cased in a cloth like material and normally painted white.  By the way, if you see that stuff, don't bother it.  However, what about the vinyl floor in your kitchen or bathroom or the adhesive that holds it down?  What about the drywall that isn't drywall, but you think it is?  What about the joint compound on your walls, or caulk on your windows, or tape on the seams of the duct work in your house?  Yup, it's even on your roof.  Asbestos has crept it's way into every aspect of a house, though outlawed  around 1990, it's still hanging around.  It's in your walls, on your ceiling, on your floor, and maybe even in your hairdryer (unlikely, but maybe).  This is why it is so important to be educated on the projects you plan to tackle and what products were used during the life of your house.  Asbestos can cause several medical problems and some fatal.  Are you willing to risk your health or the health of others, including your family, because you did not know.  Here is your wake up call.  Also, building materials from foreign country's may still contain these harmful materials. 
So what do we do?  Dig big holes and bury the very houses we live in?  No.  We have to change our mindset as to how we are going to prepare to do a project.  Will it be more time consuming?  Yes.  Will there be more steps involved?  Yes.  Will we all benefit from the proper procedures during a project?  Yes.  Anytime that you are going to drill, cut, or grind something and you are not sure if it has asbestos, lead, or anthing else potentially harmful, here are some safety and protection steps to take. 
Prepare the site:  Hang plastic on door ways and over widows and cover the floor.  2 mil or greater will have the strength to take some abuse.  Make sure and tape all seam to prevent dust from getting around the plastic.  Make sure vents, returns and exhaust, are covered, we don't want that dust blowing back into the air once we are done.  If a door way has to be used or is in a heavy traffic area, cut a slit in the plastic or spend a little money and get the self adhesive zippers to make access through the plastic.  the main thing is to prevent the dust from spreading past the work area.
Protective gear: Wear a respirator or mask suitable for the job at hand, not those thin paper masks meant for painting, I'm talking an N95 with hot air exhaust or reuseable respirator with replaceable cartridges.  Coveralls, Tyvek or suitable brand that covers to the wrists and ankles.  Gloves, something nitrile and puncture resistant. Safety glasses, self explanitory.  If your coveralls don't have a hood, then a hat of some kind that covers your hair and maybe the back of your neck.  Boot covers, these may or may not be needed depending on your project. Hang warning signs that will tell people of the potential dangers, LEAD work in progress or High Dust Area or ASBESTOS.   This will be a small investment, but the point of this is: 1) to protect you and your health and 2) so that you have something to remove and dispose of so that you don't take the dust and fibers home. 
Work smart: Try and demo in one day so that clean up can begin as soon as possible.  This will be especially important if your work area is in a high traffic zone.  The longer removal takes the high the risk of dust and fibers contaminating areas outside the work zone.  Use heavy duty trash bags or contractor bags for debris, use a HEPA vac to remove the air in these bags before closing them and tape them shut.  Also, place discarded potective gear in bags and remove the air in the same way and tape shut.  Remember to wash your hands and no food or drink allowed in the work area PERIOD.
Clean Up:  This is a critical step, it is as important as the finished product.  When you are ready for this step there should not be any demo work left to do.  There should be dust and small debris on the plastic.  How do we handle this, vacuum right?  Use a HEPA vacuum to get up the dust and small debris, take down the plastic on the walls and over the windows and place it on the plastic on the floor.  Our goal is to remove all the plastic from the house in one step.  Fold everything up and place it in a contractor bag.  Even the ground outside should remain clean from hazardous materials.  Wipe down any horizontal surface that has dust on it, now the improvements can begin.

Lead and asbestos are fine where they are until they are disturbed or are in areas that have deteriorated.  If you don't feel comfortable with any of these steps, seek out a professional for help.  Remember, it's your health and the health of your family at stake. 
0 Comments

Contractors

3/12/2011

1 Comment

 
I have read a few articles on msn.com lately about contractors and home projects.  These articles are good thought provokers and bring to light some good points, but maybe some that don't apply to your particular area, county, or city.  Obviously if you are doing a home remodel project on a house you plan on selling, you want to make sure the project will add value to your home as well as functionality.  If you don't plan on selling the home, then adding value may not be as important as funtionality or "want to".  It's your decision and your home, take your time and make lists. 
In these difficult times there may be some shady contractors or even fly-by-night guys out there.  If you want quality work there is a price to be paid.  Here's a good saying: "Cheap work isn't good and good work isn't cheap."  Not always the case, but something to keep in mind.  I know statistically the price of work has come down, but the price of material has not.  So you might find the contractor cheaper, but expect to pay the same if not more for material.  Many contractors out there are willing to discount their work just to get the job and there's nothing wrong with helping those in your community out.  The things I would watch out for are guys you charge not only for material used on the job, but all the material they bought and maybe even contractors who charge by the hour.  In remodeling you don't know what you are going to find behind drywall or plaster or under the floor or in the pipes until you get into it.  There's nothing worse than under estimating and over paying.  For me it's just easier to charge by the job and then however long it takes is on me.  It also may be a good idea to check with your local Chamber of Commerce to see if the contractor is a member.  The guys who invest in their community are the ones you can normally count on.  Also, if something should happen to be wrong or go wrong after completion, a good contractor will come back and fix it at no cost.
There may be some unique situations also.  If you know a contractor personally or have a good relationship with one, there may be times where some "experimentation" comes up.  New systems or new materials may be introduced or maybe it's just gain some experience, the contractor may approach the home owner with this idea.  I guess the home owner may approach the contractor with this idea, who knows it's a crazy world.  If this situation does come up you ,the homeowner, could possibly get the work done for the price of materials.  Just saying, if you don't mind being the guinea pig it might be a worth while venture.
All in all, remodeling and renovation don't have to be scary or bad projects.  Make some lists, decide what you want and start asking questions.  Contractors may not have all the answers and may have questions themselves.  It's going to take time, life isn't a one hour tv show, it going to take some money, and there will be dust.  Remember, the lowest bid isn't always the best and the job will only be as good as the material you are working with.  Don't expect a million dollar bathroom for two thousand dollars.  Happy remodeling!
1 Comment

I'm sensing a theme

27/11/2011

1 Comment

 
The month of November has been good to me and very busy.  It seems alot of people are really ready for roof work.  In the last month I've had 4 roof jobs and I know there have been several more going on around town.  Three of my roof jobs were replacements, but one was to fix what stupid people do when they decide on a weekend project.  When you butt two different roofs together it is always a good idea to put some flashing between them.  This is on a closed in porch where the main roof (house roof) met the roof of the porch, but they were not combined into one.  These roofs just butted up against each other and a small drip edge was bent to cover the gap, really doesn't work very well.  This had to have leaked from the very first rain after it was built.  Water will find your mistakes and often make you pay for them.  Water was leaking inside and ruined alot of insulation and the ceiling material.  You know what happens when water and lumber combine, m-o-l-d.  There was a lot of mold on the joists, another issue that had to be handled.   In order to fix the leak, I added flashing between the roofs, papered under the house shingles over the flashing, and then added my roofing material in the same manner.  Roof cement is also added as another barrier to water infiltration.  Of coarse I finished the job by re-insulating and installing a new ceiling. 
Oh yeah, still have two more roof estimates to do and already have roofs lined up for the spring.

Also, my commercial client has provided some good inside work and is giving me more opportunities for estimates which will more than likely turn into jobs. 

All of this is a good theme to carry through the rest of the month and into December.  
1 Comment

Plate Rail Complete

27/10/2011

0 Comments

 
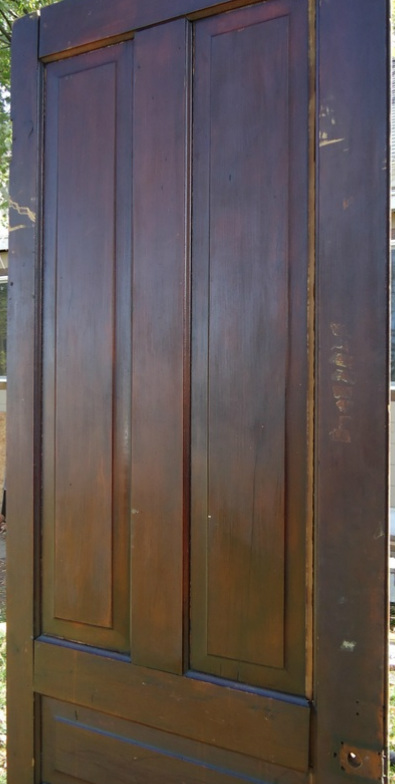
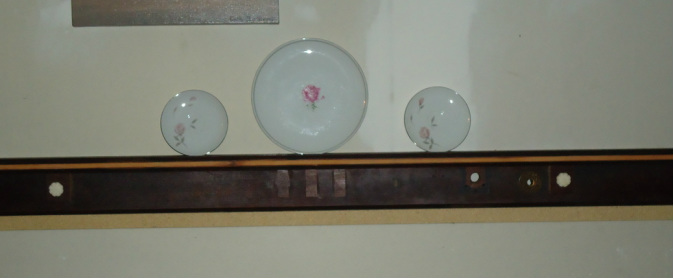
Today I finished the plate rail and here is how I did it.  If you read the previous post, you would know that I started with a 5 panel door that was at least 60 years old.  Getting this door apart was a challenge, the tenon joints were extremly tight and, of coarse, there were little finish nails hidden below the surface that had to be removed before anything was coming off.  I wasn't sure of the type of wood the door was made from since it had a finish over it, come to find out it was pine and extremely soft!  My client wanted the rail to be about 80" long so the ledger needed to be 78" ( a one inch over hang on the ends is standard if the plate rail is to be used as a shelf), the door had plenty and I could even saw off some bad places.  The rail and ledger are made from the long side beams of the door, the vertical parts that hold it all together, the panels and horizontal beams sit in grooves cut into the vertical beams.  After the door was apart, I had to come up with a plan to fill these grooves since my client wanted the routered detail to remain.  I decided to use the panels, they came from the gooves anyway so they fit and it would save time by not having to cut a piece down from some other stock.  I cut them so that the filler pieces would sit flush with the front of the routered edge, I think it looks better this way.  I had to cut two pieces per rail because the panels were not 80" long, but it worked out fine.  I glued them in place after they were sanded and polyurethaned.  I also wanted to use them to give some light contrast to the already dark finish on the wood, this allows the routered detail to stand out and be noticed.  I also cut a groove into the top rail that is 1/8" deep and 3/16" wide so that plates or other things will have a place to sit and "grab" the rail and not slide off.  When that was complete, I proceeded to assemble the rail and ledger, I used construction adhesive and brads to hold it together, made for a nice fit.  The dental blocks were made from one of  the smaller beams, I just used a table saw to cut them down to size, in this case the larger ones are 2" x 2 1/2" and the smaller ones are 1" x 2 1/2" and they are just glued on.  I drilled holes in the larger blocks and into the ledger so that the knobs could be screwed into them and to allow extra space for the long studs.  Now it's ready to be attached to the wall.  I left the rails the original thickness, normally plate rails are thinner than this one, so it's chunky and it goes with the style of my clients house.  It's a good DIY project that gets you that high end distressed look everyone is looking for right now, it also keeps good material out of the landfill.  Use what you've got, it might just start a trend.
Picture
Picture
Picture
Picture
Picture
0 Comments
<<Previous

    Author

    Craig Jones, owner of Property Serv LLC.  My goal is to better educate the homeowner and to make Richmond a better place to live.

    RSS Feed

    Archives

    October 2013
    March 2013
    November 2012
    October 2012
    June 2012
    May 2012
    April 2012
    March 2012
    February 2012
    December 2011
    November 2011
    October 2011
    September 2011
    August 2011
    July 2011
    June 2011
    May 2011
    April 2011
    March 2011
    February 2011
    January 2011
    December 2010

    Categories

    All
    1900
    2012
    5
    Ability
    Adhesive
    Advertising
    Agreement
    Agreements
    Antique
    Antiques
    Asbestos
    Backsplash
    Back Splash
    Bank
    Bar
    Barrier
    Base Board
    Baseboards
    Basement
    Bath
    Bathroom
    Bed
    Bedroom
    Bifold
    Blanks
    Block
    Blueprint
    Board
    Border
    Bowls
    Box
    Brick
    Build
    Building
    Built
    Business
    Busy
    Buy
    Cabinet
    Cabinets
    Calender
    Call
    Cap
    Caulk
    Ceiling
    Ceilings
    Cement
    Ceramic
    Certificates
    Certified
    Chamber
    Chimney
    Cleanout
    Closet
    Cold
    Collectable
    Collectables
    Collectible
    Colors
    Commerce
    Commercial
    Commments
    Completion
    Composite
    Compound
    Concete
    Concrete
    Confident
    Construction
    Contract
    Contractor
    Copper
    Corner
    Cost
    Counters
    Counter Top
    Counter Tops
    Country
    County
    Craft
    Craftsman
    Crown
    Custom
    Cut
    Cylinders
    Damage
    Debris
    Decks
    Décor
    Decore
    Demo
    Dental
    Distressed
    Diy
    Door
    Doors
    Drafts
    Drill
    Drip Edge
    Drywall
    Dump
    Dust
    Easy
    Electrical
    End
    Enjoy
    Entertain
    Epa
    Estimate
    Etching
    External
    Fab
    Fabrication
    Facebook
    Family
    Fans
    Felt
    Fence
    Fiberglass
    Financing
    Fine
    Finish
    Finishing
    Fire
    Fires
    Five
    Fix
    Fixing
    Flashing
    Floor
    Flooring
    Floors
    Flower
    Fnece
    Foam
    Foreclosure
    Foundation
    Framing
    Free
    Front
    Furniture
    Garage
    Garden
    Gift
    Give
    Glass
    Granite
    Grapple
    Green
    Grout
    Happy
    Hazards
    Health
    Heat
    High
    Hinges
    Hiring
    Hobbie
    Hole
    Home
    Homeowner
    Home Remodeling
    Homework
    House
    Household
    Hydraulics
    Install
    Installation
    Insulation
    Interior
    Iron
    Items
    Jamb
    Job
    Jobs
    Kitchen
    Kitchens
    Knob
    Knowledge
    Laminate
    Landfill
    Landscaping
    Lanscape
    Law
    Lead
    Leak
    Leaks
    Leaky
    Ledger
    Life
    Lights
    Limestone
    Live
    Living
    Local
    Logo
    Look
    Lumber
    Maintenance
    Management
    Mantenance
    Maple
    Master
    Material
    Mig
    Mind
    Mix
    Moisture
    Monthly
    Mortar
    Mud
    Nail
    Network
    New
    News
    Old
    Opening
    Outdoor
    Outside
    Owner
    Owners
    Paint
    Painting
    Pane
    Panel
    Paper
    Patching
    Patterns
    Paver
    Pavers
    Peace
    Pine
    Pipe
    Pipes
    Plaster
    Plastic
    Plate
    Play
    Plumbing
    Pointing
    Porcelin
    Porch
    Portland
    Precast
    Prehung
    Price
    Problem
    Problems
    Professional
    Project
    Projects
    Property
    Pvc
    Quality
    Radius
    Rail
    Rain
    Rating
    Ready
    Rebar
    Rebuild
    Reclaimed
    Recycle
    Recycled
    Remodel
    Remodeling
    Renovate
    Renovation
    Renovations
    Renovator
    Rental
    Renters
    Repair
    Repairs
    Replace
    Replacing
    Repurpose
    Re-purposed
    Restore
    Re Store
    Re-store
    Resturant
    Retaining
    Reuse
    Re Use
    Reused
    Right
    Roof
    Roofing
    Roofs
    Room
    Rough
    Rrp
    Rustic
    Safe
    Safety
    Sale
    Sanded
    Sanding
    Saw
    Schedule
    Scraping
    Screws
    Secure
    Security
    Shapes
    Shelves
    Shingle
    Shop
    Shower
    Sidewalk
    Siding
    Sill
    Sink
    Skills
    Smoke
    Soft
    Spalted
    Special
    Stain
    Stainless
    Steel
    Stick
    Stone
    Store
    Storm
    Stressed
    Strong
    Stucco
    Stuff
    Styrofoam
    Summer
    Surround
    Sweating
    System
    Tables
    Tape
    Taping
    Tear Off
    Technology
    Thin Set
    Tile
    Timbers
    Time
    Tip
    Torch
    Trailer
    Treated
    Tree
    Trim
    Trowel
    Truck
    Tub
    Tuck
    Unique
    Unsanded
    Upkeep
    Used
    Useful
    Valve
    Vintage
    Wall
    Walls
    Warm
    Water
    Waterproof
    Water Proof
    Wayne
    Weatherization
    Weekend
    Weld
    Welder
    Welding
    Window
    Windows
    Winter
    Wiring
    Wonderful
    Wood
    Woodworking
    Work
    Workers
    Yard

    RSS Feed