Interior prehung doors. Here are a few tips when installing these. First, make sure the door jambs have equal distance around them in the rough opening. From here I think it's personal preference. After the door is leveled and squared up and the shims are installed, I take out the middle screws of the hinges and replace them with 3" screws into the studs. Now on the latch side you will obviously be drilling into the jamb. I use a countersink with a center drill bit to make my pilot holes, hint: make sure you install screws where the shims are. I may use 2 1/2" or 3" screws on this side, it depends on how much space is between the jamb and the stud. Some people use nails, I like screws, personal preference. Fill in the holes using wood filler, sand smooth and paint. The key with this is making sure the door closes and latches without rubbing. Open and close the door as many times as needed to make sure this is achieved. Some older homes have settled or come out of square and will pose a challenge when using prehung doors. Also remember that the standard sizes from back in the day aren't the same as they are now. Now things are "nominal", that means things are an 1/8" to a 1/4 inch shorter depending on the manufacturer. This is also true with door slabs, bifold doors, ect. Measure the product you plan on using to ensure things will go as planned.
|
Senario: You have this awesome piece of trim that you just pulled off the wall and you want to reuse it. The problem is the nails are stuck in it. How do you get them out? "Duh, simple.", right.....maybe not. Instead of knocking the nails out from back to front, pull them the rest of the way through the board. If you go the "traditional" route there is a chance that this piece of trim will be damaged and that means filler and trying to match stain or paint. A good pair of pliers should give you enough grip to pull the nails straight on through.
Today I finished the plate rail and here is how I did it. If you read the previous post, you would know that I started with a 5 panel door that was at least 60 years old. Getting this door apart was a challenge, the tenon joints were extremly tight and, of coarse, there were little finish nails hidden below the surface that had to be removed before anything was coming off. I wasn't sure of the type of wood the door was made from since it had a finish over it, come to find out it was pine and extremely soft! My client wanted the rail to be about 80" long so the ledger needed to be 78" ( a one inch over hang on the ends is standard if the plate rail is to be used as a shelf), the door had plenty and I could even saw off some bad places. The rail and ledger are made from the long side beams of the door, the vertical parts that hold it all together, the panels and horizontal beams sit in grooves cut into the vertical beams. After the door was apart, I had to come up with a plan to fill these grooves since my client wanted the routered detail to remain. I decided to use the panels, they came from the gooves anyway so they fit and it would save time by not having to cut a piece down from some other stock. I cut them so that the filler pieces would sit flush with the front of the routered edge, I think it looks better this way. I had to cut two pieces per rail because the panels were not 80" long, but it worked out fine. I glued them in place after they were sanded and polyurethaned. I also wanted to use them to give some light contrast to the already dark finish on the wood, this allows the routered detail to stand out and be noticed. I also cut a groove into the top rail that is 1/8" deep and 3/16" wide so that plates or other things will have a place to sit and "grab" the rail and not slide off. When that was complete, I proceeded to assemble the rail and ledger, I used construction adhesive and brads to hold it together, made for a nice fit. The dental blocks were made from one of the smaller beams, I just used a table saw to cut them down to size, in this case the larger ones are 2" x 2 1/2" and the smaller ones are 1" x 2 1/2" and they are just glued on. I drilled holes in the larger blocks and into the ledger so that the knobs could be screwed into them and to allow extra space for the long studs. Now it's ready to be attached to the wall. I left the rails the original thickness, normally plate rails are thinner than this one, so it's chunky and it goes with the style of my clients house. It's a good DIY project that gets you that high end distressed look everyone is looking for right now, it also keeps good material out of the landfill. Use what you've got, it might just start a trend. 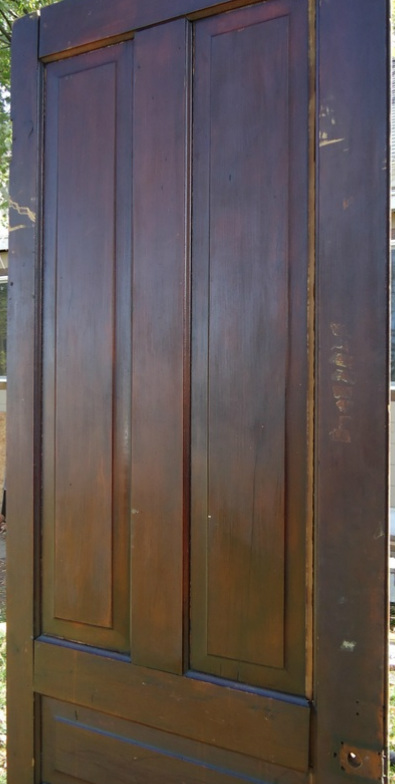 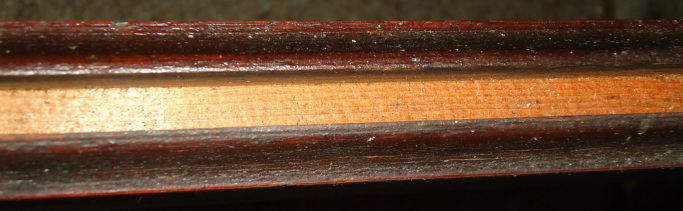    I am doing a couple of reclaimation projects, one on a front porch ceiling and one for a client who wanted a plate rail. My client, lets call her Jane, has a house built circa 1900 and had doors that came from the house at least 60 years ago. Well, instead of just throwing these away, Jane wanted to use one of the doors to make a plate rail. The doors came from the house, fit the houses' style, and it is a good use of the material, so that's what I set out to do. Getting the old door apart was a J-O-B. The crafstman sure did build them to last, but with the help of a motivator, a rubber mallet, and a couple of hours of using it to beat my head, the door finally gave up the fight. Whew, not a moment to soon, my head was getting sore. Anyway, I have the pieces cut and got a few details with Jane ironed out, we decided on dental blocks for moulding, I am ready to proceed with this project. I will get more pics up as the project progresses. 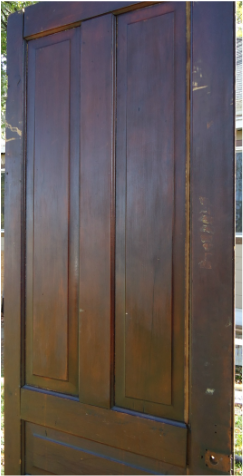 Just a quick update on the 1890 house, I have managed to get the screen door mounted despite the weather and the front door is also in. I have the kitchen apart and the old plaster removed from one wall so that I can update some electrical and insulate. There will be a new kitchen window installed and new wiring as well. I do have a few more pics to upload and I will get those on soon. There has been alot of work done in the last two weeks, keep checking back for more updates. Don't forget, if you have a project that you need help on, call me or shoot me an email. Also, you can schedule a time from the "contact" page.
|
AuthorCraig Jones, owner of Property Serv LLC. My goal is to better educate the homeowner and to make Richmond a better place to live. Archives
October 2013
Categories
All
|
 RSS Feed