It's been a few weeks since I last posted anything, there's a reason for that.....work. I have been crazy busy lately and I am so glad for it. Here are some of the jobs: 3 roofs, gutter clean outs, painting, gutter repair, ceiling repair, tree cutting, and the list goes on. This is normally getting to my slow time, but the whole year has been slow, like I said I am grateful for the work. If you need something done, get on the schedule now! Otherwise you might have to wait until January. Also still need to complete one project for my cool client "Jane". It might be her Christmas present.
|
Follow us on Facebook to be entered for a Galo's $50 gift card, that's dinner for two! We will give it away when we reach 200 fans. Spread the word and dine at Galo's in Richmond on us.
Today I finished the plate rail and here is how I did it. If you read the previous post, you would know that I started with a 5 panel door that was at least 60 years old. Getting this door apart was a challenge, the tenon joints were extremly tight and, of coarse, there were little finish nails hidden below the surface that had to be removed before anything was coming off. I wasn't sure of the type of wood the door was made from since it had a finish over it, come to find out it was pine and extremely soft! My client wanted the rail to be about 80" long so the ledger needed to be 78" ( a one inch over hang on the ends is standard if the plate rail is to be used as a shelf), the door had plenty and I could even saw off some bad places. The rail and ledger are made from the long side beams of the door, the vertical parts that hold it all together, the panels and horizontal beams sit in grooves cut into the vertical beams. After the door was apart, I had to come up with a plan to fill these grooves since my client wanted the routered detail to remain. I decided to use the panels, they came from the gooves anyway so they fit and it would save time by not having to cut a piece down from some other stock. I cut them so that the filler pieces would sit flush with the front of the routered edge, I think it looks better this way. I had to cut two pieces per rail because the panels were not 80" long, but it worked out fine. I glued them in place after they were sanded and polyurethaned. I also wanted to use them to give some light contrast to the already dark finish on the wood, this allows the routered detail to stand out and be noticed. I also cut a groove into the top rail that is 1/8" deep and 3/16" wide so that plates or other things will have a place to sit and "grab" the rail and not slide off. When that was complete, I proceeded to assemble the rail and ledger, I used construction adhesive and brads to hold it together, made for a nice fit. The dental blocks were made from one of the smaller beams, I just used a table saw to cut them down to size, in this case the larger ones are 2" x 2 1/2" and the smaller ones are 1" x 2 1/2" and they are just glued on. I drilled holes in the larger blocks and into the ledger so that the knobs could be screwed into them and to allow extra space for the long studs. Now it's ready to be attached to the wall. I left the rails the original thickness, normally plate rails are thinner than this one, so it's chunky and it goes with the style of my clients house. It's a good DIY project that gets you that high end distressed look everyone is looking for right now, it also keeps good material out of the landfill. Use what you've got, it might just start a trend. 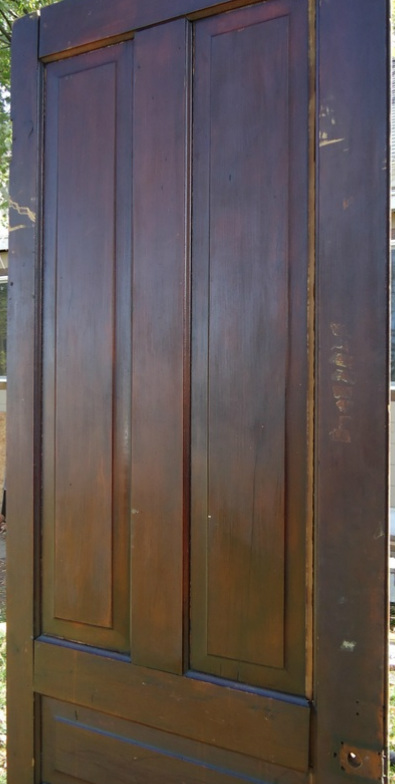 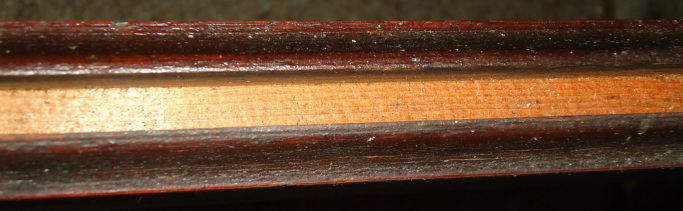    I am doing a couple of reclaimation projects, one on a front porch ceiling and one for a client who wanted a plate rail. My client, lets call her Jane, has a house built circa 1900 and had doors that came from the house at least 60 years ago. Well, instead of just throwing these away, Jane wanted to use one of the doors to make a plate rail. The doors came from the house, fit the houses' style, and it is a good use of the material, so that's what I set out to do. Getting the old door apart was a J-O-B. The crafstman sure did build them to last, but with the help of a motivator, a rubber mallet, and a couple of hours of using it to beat my head, the door finally gave up the fight. Whew, not a moment to soon, my head was getting sore. Anyway, I have the pieces cut and got a few details with Jane ironed out, we decided on dental blocks for moulding, I am ready to proceed with this project. I will get more pics up as the project progresses. 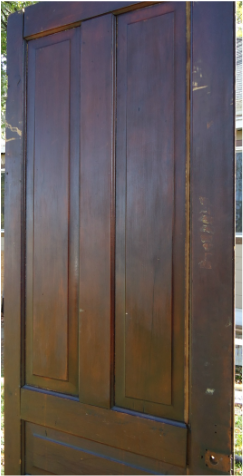 I have been asked by some to write about property management as it relates to Property Serv. As some of you know, Property Serv offers maintenance agreements that can tailored to your needs. If you want complete maintenance and upkeep, we can do that; if you want to set up to have your gutters cleaned twice a year, we can do that. It is set up in such a way that if the work is beyond what we can personally handle, then Property Serv becomes the project manager and subs out the work. You still only make one phone call and we worry about the rest. We are insured and we will make sure anyone we use is as well. Being a member of the Wayne County Area Chamber of Commerce gives us plenty to choose from if needed.
The idea in mind, or the thought that created this, is the busy professional or owner of multiple properties. A busy professional, doctors, lawyers, professor, business owners don't always have time to do the necessary things that need to be done or even the knowledge sometimes to complete a repair or wanted project. As far as that goes, who wants to spend vacation time or Saturdays tackling repair/remodel stuff? The owner of multiple properties is kind of in the same boat, but on a grander scale. Normally it is one person who owns a few rental properties, this is all well and good until there are multiple "fires" to put out. Upkeep on your house is hard enough, not to mention the houses you don't live in. This is where we come in. We, together, can put things in place so that upkeep and maintenance are taken care of. We can be proactive and handle problems before they arise or grow into bigger ones. Putting plaster or a coat of paint over it just doesn't fix it normally. YOU the homeowner are responsible and if there are renters involved, there must be a place that is safe and functional for people to live. If you don't care, why should the renter? I am wrting this to bring things to your attention, things you already know, but that are sometimes overlooked. There is no need in being overwhelmed or stressed, Property Serv is here for you and we are only a phone call or email or facebook message away. We don't want to take over your life, we want to make it more enjoyable for everyone involved. We want to take a good community, a good neighborhood, a good street and make it better. If you need us, here we are. I'm working on a new project that is "green" and cool and unique at the same time. I know what you're thinking, "All of that at one time in one space.....there must be a rift in the time space continuum." Well, hopefully not and yes that is alot of ways to describe one project, but it's true. It has to do with a front porch ceiling and reclaimed wood. I'll leave it at that for now. Look for pics and more blog posts about this wonderful thing happening in Richmond, Indiana.
I completed a partial chimney rebuild last week. The house was built around 1900 and I wanted to keep the character of the house and chimney. The original chimney was covered in a soft membrane that was supposed to be waterproof. Turns out it wasn't and water collected in the bricks and mortar. After years of this abuse, the bricks were spalling and crumbling and the grout was like loose sand. I was able to salvage some old bricks and I had our local brick place (Richmond Builders Supply) hand pick new bricks that matched the old as close as possible, picked up a new precast crown, new rain cap, two new liner tiles, and had custom stainless steel drip edge made. All in all a good project and very thankful for the opportunity.  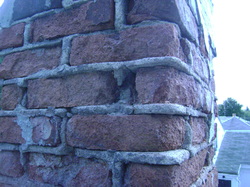 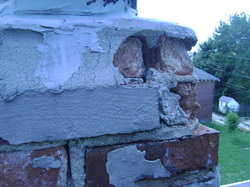 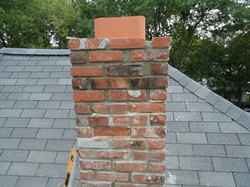 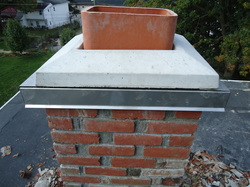 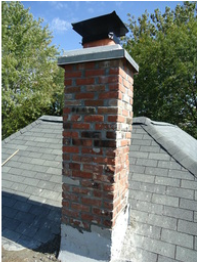 I'm going to be installing an EIFS (External Insulation Finishing System) as soon as the weather allows. I'll post how it goes, some tips, and steps involved.
Recently I have been doing some work with various types of cement, mortar, portland, and grout (yes grout is a "cement"). This made me wonder "I wonder if the average home owner knows what type of cement to use where?" We all have seen the leaky basement that someone has tried to patch with something, but with the way it seems to have run down the wall or been thrown against it, chances are good it wasn't the right stuff. Not all concretes are created equal. If you have a leaky basement or foundation, you will need a hydraulic cement. No, not the cement they put in the back of pickup trucks to make them low riders (that is how they do it right?) Hydraulic cement is actually a cement that forms a waterproof seal, unlike the normal ready mix in a bag. Portland cement is an example of this, very sticky, but very strong. Also, it is better to patch a leak from the outside versus the inside, for obvious reasons.
Now, it seems every house has a retaining wall that has been standing for a hundred years. You know the one, it's leaning over and there is grass growing between the stones. Believe it or not these walls do serve a purpose and if you live on a hill you know exactly what it is. These walls keep your yard yours and not some city or county road clearing project. However, they wall can't it's job if the mortar joints are loose or missing. Every freeze thaw cycle kills a weak joint and undermines the strength of the wall. Filling in the gaps or replacing loose joints is called tuck pointing. There are ready mixes available for this and (wait for it) to make "special blends" portland cement can be added. Adding portland will give mortar more strength, more sticking power, and add some water proofing characteristics. What about sidewalks and driveways? Your typical ready mix is alright to use as sidewalk material, but there are better versions of the same stuff. There are ready mixes that are more waterproof and others that are more impact resistant. Most sidewalks are about four inches thick and most are just poured right on the soil. I like to dig a little deeper and add a base to pour the cement on. Soft limestone is good for this, put an inch or two down and compact it. This gives something for the cement to grab a hold of and also forms a good strong base that should prevent cracking. If your budget doesn't allow for the extra step then pour your sidewalk at 6 inches with a quality product for a long lasting pathway. If you are resurfacing or adding a cap to old concrete, a step that is often skipped is etching. Concrete must be etched for any new cement to adhere to it. If you skip this step, after a few winters you'll be doing it again. I know someone out there was laughing when I said the grout was a cement. It is, Google it. Most homeowners have done some tile work before and have therefore grouted. Here's a question, sanded or unsanded? Oh, you didn't get that far in the store? I'll let it slide this time. Sanded grout is for joints over 1/8" and unsanded is for anything smaller. There may be some exceptions to this such as glass tile, but this is the general rule. Always read the health hazards when dealing with cement, it can cause skin burns, eye and lung irritation and lung cancer. Wet cement is caustic so where gloves and wash off cement that comes in contact with your skin. Don't forget to leave comments or ask questions, we like that kind of stuff. It's one of those lazy Sunday afternoons and I decided to do some research. I'm looking at ways to build radiused wall (walls with curves) and completely new custom shower systems. Like all things, construction materials are getting lighter and more composite, in a shower situation this is good. Traditional materials are subject to water and mold in a wet environment, but the new systems are impervious to water, at least in theroy. The ease of use has also improved over time. The new shower systems now have a styrofoam cored board covered in a water proof membrane and these can be used on concrete walls, cinderblock, and even over studs. Then the tile is installed the same manner using thinset. This foam is even structure to the point that benches and seats can mbe made out of it and installed in the shower. No 2x4 studs or concrete board, just lightweight styrofoam. For those that like warm floors, manufacturers even make a floor warming system to be used in conjunction with this light tile backing material. Although, a fire rating has not been established by the manufacturer, so maybe putting this off is a good idea. How does a radiused wall come into play? The foam board can be cut in such a way that it can be bent around a radius and therefore making your custom shower design a reality. So far I like Kerdi board and Wedi products for shower systems. There are not any local distributors of these materials, but regional contacts. So, if you are looking to get a high end design with cutting edge construction technology, what are you waiting for? I have requested price lists and catalogs and I am looking far anyone who is wanting to experiment.....
|
AuthorCraig Jones, owner of Property Serv LLC. My goal is to better educate the homeowner and to make Richmond a better place to live. Archives
October 2013
Categories
All
|
 RSS Feed